
Reconciling Admittee With Your Books
A guide for finance teams: match each Admittee deposit to your bank, export every line behind it, and see what each registration was for.
This guide is for the person who closes the books: a bookkeeper, business manager or finance director. It shows how to match each Admittee deposit to your bank statement and how to get a line-by-line export of every sale behind it, with each registration on its own row.
Admittee sends your money to your bank in deposits, also called payouts. One deposit usually holds many sales from several days, minus fees and any refunds. Reconciling means tying each deposit back to those sales.
Who can do this?
You need the Admin, Owner or Finance role. The Finance role opens Reports, including the Deposits, Payouts, Disputes and Tax tabs, without being able to change fee settings. To give someone the Finance role, see User Roles & Permissions.
Check a deposit against your bank
Start here if you only need to confirm that a deposit is right.
- Open Reports and select the Deposits tab. Each row is one deposit Stripe sent to your bank, with the date it posted and the amount.
- Click a deposit to open its statement. The statement groups that deposit's money by category and item type, with gross, fees, refunds and net for each.
- Read the message on the statement. It says whether the statement ties to your bank deposit, or how much it's short or over.
- To keep a copy, use Export xlsx or CSV. The spreadsheet has separate sheets for the statement, Stripe adjustments and refunds.
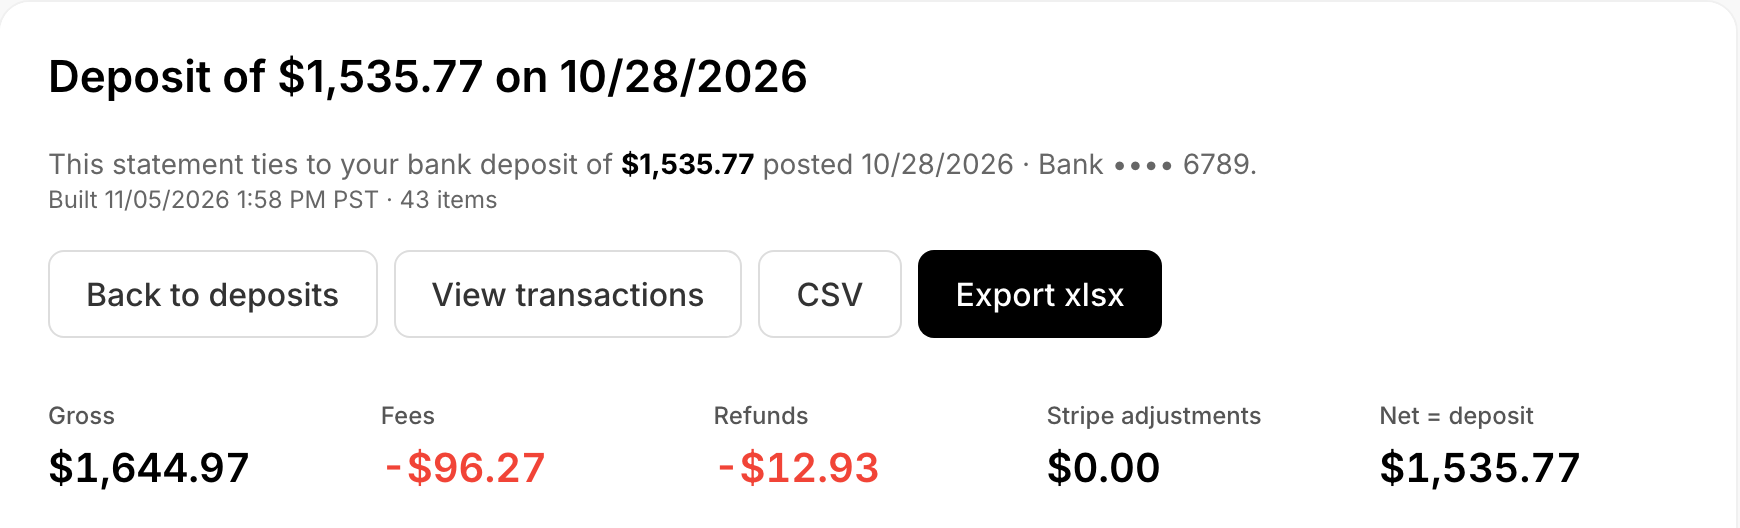 A deposit statement showing that it ties to the bank deposit, with gross, fees, refunds, Stripe adjustments and net.
Export every line behind your deposits
Use the Transactions tab when you need each sale on its own row, for example to post revenue to accounts by sport or program.
- Open Reports and select the Transactions tab.
- Next to the date range, choose Deposit date. The date range now filters by the date money reached your bank, not the date of the sale.
- Set the date range. For a month-end close, pick the first and last day of the month.
- Optional: click Filters to narrow the list. Item type limits it to one kind of sale, such as Registration or Tickets. Category limits it to one category, such as Athletics.
- Click Report to download the spreadsheet.
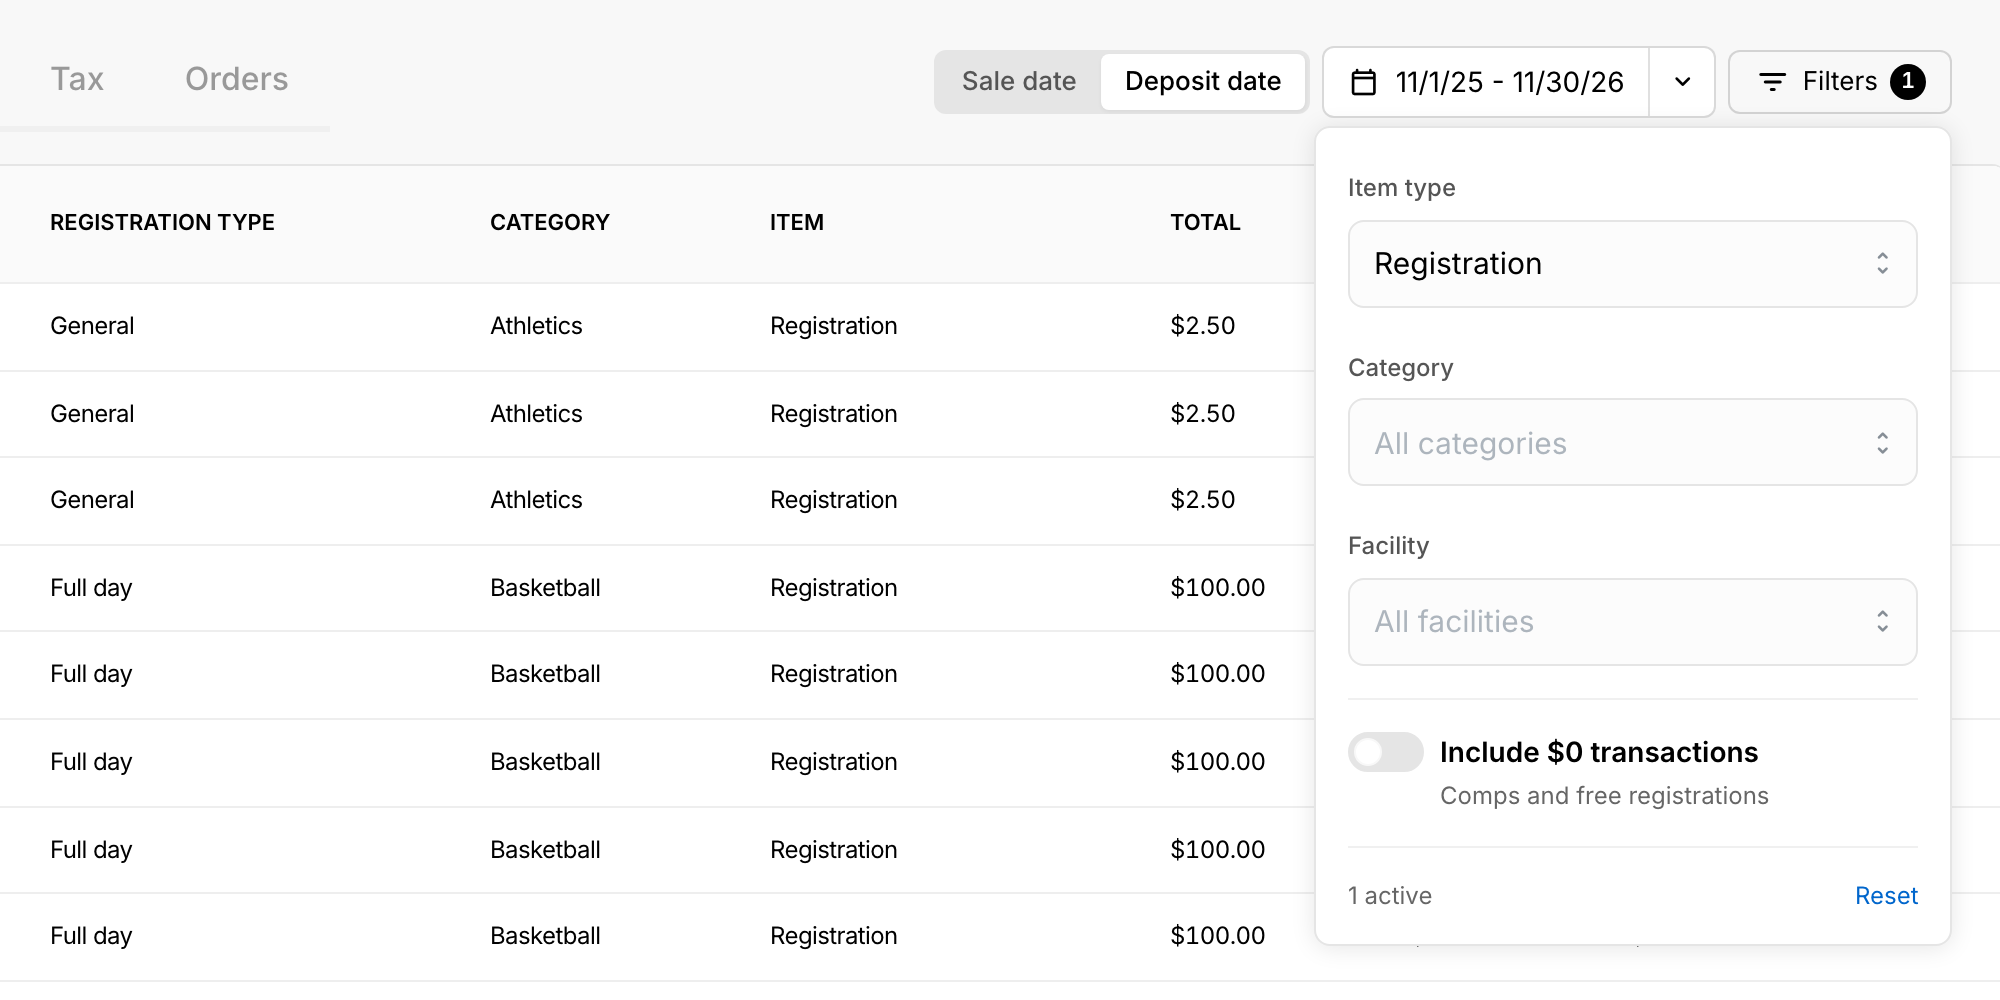 The Transactions tab with Deposit date selected and the Filters panel open, set to show only registrations.
The file name says what's inside, for example transactions-deposit-2026-10-01-to-2026-10-31-registration.xlsx. It names the date type, the range and any filter, so a folder of monthly exports stays easy to read. The export includes the columns you have visible in the table, in the same order.
To tie the export to your bank, group the rows by Deposit Date and add up Net for each date. Each total should equal that day's deposit on your bank statement and on the Deposits tab.
What does each column mean?
- Date — when the sale happened.
- Deposit Date — the calendar date the money reached your bank.
- Customer — the buyer's name or email.
- Title — what was sold: the event, registration, pass or fundraiser.
- Registration type — for registrations, which option was bought, such as "Boys' Basketball: JV" or "Cheer UCA Regionals". Blank for other sales.
- Category — the category set on the event or registration.
- Item — the kind of sale: Registration, Tickets, Passes, Membership, Donation, Concessions, Rental, Contract or Card on file.
- Total — what the customer was charged.
- Fee — the total fee on the transaction, whoever paid it.
- Fee source — Settled once the money has been deposited (the exact fee Stripe took), Quoted before that (the expected fee).
- Fees Paid By — whether the buyer or your organization covered the fees.
- Refunded — how much of the sale has been refunded so far.
- Net — what this row put into your bank. Total minus Fee equals Net.
How are registrations shown?
Each registration gets its own row. If a parent pays for two registrations in one checkout, say Varsity Basketball and Middle School Basketball, the export shows two rows. Each row has its own registration type, total, fee and net, and the two rows add up exactly to the single payment.
 One checkout for two weeks of a camp, shown as two rows with registration types Week 1 and Week 2, each with its own total, fee and net.
Refunds land on the registration that was refunded. A refund for one child's sport shows against that sport, not the whole order. Fees and discounts are split across the rows in proportion to what each registration cost.
A small number of older registration orders don't have per-registration detail on file. Those still show as a single row with the Registration type left blank.
How are refunds, fees and disputes shown?
These appear as their own rows when Deposit date is selected, so every deposit adds up:
- Refunds are negative rows, dated by the deposit the refund was taken out of. The original sale keeps its full amount.
- Disputes, Stripe fees and other Stripe adjustments are their own rows, dated by the deposit they came out of. Include them in your total.
The exported spreadsheet includes a Notes sheet that repeats these points for whoever receives the file.
What about sales that haven't been deposited yet?
Deposit date only shows money that has reached your bank. To see recent sales that are still on the way, switch to Sale date. Their Deposit Date reads Pending until the deposit posts.
What if a deposit doesn't match?
- Make sure you included the refund, dispute and Stripe fee rows for that deposit date.
- Check that no filter is narrowing the list. The Filters button shows a count when filters are on, and Reset clears them all.
- Open the deposit on the Deposits tab. Its statement says whether it ties to your bank and by how much it's off.
If the statement still doesn't tie, contact Admittee support with the deposit date and amount.
A month-end routine
- On Reports → Deposits, confirm each deposit for the month matches your bank statement.
- On Reports → Transactions, choose Deposit date, set the range to the month, and export.
- In the spreadsheet, group by Category and Registration type (or by Item) to post revenue to the right accounts.
- Save the file. Its name records the month and any filters you used.
Related: Tips for Using Data Insights, Exporting Reports and Managing Finances & Payouts.