
Set Ticket Prices That Feel Fair and Support Your Program
Compare fee modes, build processing costs into an all-in ticket price, and set prices that protect your program and feel fair to families.
Set Ticket Prices That Feel Fair and Support Your Program
Your ticket price needs to support your program and feel fair to the families who attend. A good starting point is a price that includes the cost of selling the ticket, so buyers can decide what to spend before they reach checkout.
Our recommendation: when you control your ticket prices, build processing costs into the price and choose We absorb fees. Despite the setting's name, this doesn't mean leaving those costs out of your budget. You recover them through the ticket price, just as you do the other costs of putting on the event.
Start with your revenue goal and your audience
Start with what the event needs to contribute to your program, then estimate how many paid tickets you can realistically sell. Dividing your revenue goal by those expected sales gives you a target net per ticket. Here, net means what you keep after ticketing and processing fees, before other event costs.
Total ticket proceeds = tickets sold × average net per ticket. Keeping more from each sale only helps if enough people still buy. Consider past attendance, what buyers paid in total last year, and what a family buying several tickets will spend. A target net is a budgeting starting point, not a guarantee that buyers will accept the resulting price.
You don't have to keep last year's price automatically. If it no longer supports the event, consider a higher price and explain what admission supports. If affordability is the priority, budget for a lower price or specific student, senior, or other discounted ticket types. Include those discounts in your expected average net.
Make the full price clear from the start
Nobody breaks out every cost of running a game and tacks each one onto the ticket. Imagine a checkout that read:
- Ticket: $8.00
- Referee fee: $0.90
- Gym lighting: $0.35
- Ticket-taker: $0.25
Those costs are simply what it takes to put on the event. Payment processing and the ticketing platform belong in the same budget. Including them in your price lets a family work out what admission will cost without discovering an additional charge after deciding to buy.
There is good reason to take that clarity seriously. In Baymard Institute's checkout research, high extra costs—including shipping, taxes, and fees—are the leading reported reason for abandonment after excluding people who were just browsing. That research covers ecommerce broadly; it doesn't prove that removing a fee line increases school-ticket sales. It does support making the full cost easy to understand early.
Upfront pricing also matters under the FTC's Rule on Unfair or Deceptive Fees, effective May 12, 2025. Covered businesses advertising live-event tickets must prominently show the total including mandatory fees. Itemizing those fees is allowed when the total is most prominent. The guidance also addresses prechecked charges: an opt-out box doesn't by itself make a charge optional for price-display purposes. Choosing a fee mode doesn't replace the need to advertise prices accurately.
Choose the fee mode that fits your pricing decision
Every event and pass has three Processing fee choices. To make the tradeoffs concrete, suppose you want to keep about $10 per ticket. This example uses the default online ticket rate of 5% + $0.75 per ticket. These are illustrations, not suggested prices for your event. Your organization may have custom pricing; check Account & Settings → Plan & Fees and choose a price that works for your audience.
| Mode and ticket price | What the buyer sees | Buyer pays | You net |
|---|---|---|---|
| We absorb fees, priced at $11.50 | One admission price, no separate processing fee | $11.50 | $10.17 |
| Buyer chooses at checkout, priced at $10 | $10 admission and a prechecked request to help cover $1.25 in fees | $11.25 if they cover fees; $10 if they decline | $10 if they cover fees; $8.75 if they decline |
| Buyer always pays fees, priced at $10 | $10 admission plus a $1.25 service fee | $11.25 | $10 |
| We absorb fees, keeping a $10 price | One admission price, no separate processing fee | $10 | $8.75 |
Use all-in pricing as your default when you can set the price. It gives buyers a clear total and lets you plan your net per sale. It doesn't guarantee the highest sales volume or revenue; the price still needs to work for your audience.
If your base ticket price is fixed, consider Buyer chooses at checkout when requesting help with costs fits your community and the institution can budget for buyers declining. Each buyer who declines in this example reduces your proceeds by $1.25. Don't assume a particular acceptance rate, or treat leaving a prechecked box checked as evidence of buyer satisfaction.
Buyer always pays fees gives you a predictable net per sale when the base price must stay fixed and fees may be added. Buyers must still be shown the full mandatory price upfront. If a board or league sets a price limit, confirm whether it limits the base price or the total a buyer can be charged.
Don't absorb fees without budgeting for them. Keeping a $10 all-in price can be a deliberate affordability choice. Just plan around $8.75 in proceeds rather than $10.
Set an all-in price
Admittee's default online rates are 5% + $0.75 per ticket and 5% + $1.50 per pass or membership. These fees include card processing and the platform. Custom pricing may apply to your organization, and point-of-sale rates differ. Use your actual rate from Account & Settings → Plan & Fees.
For a percentage-plus-fixed rate, calculate:
All-in price = (target net + fixed fee) ÷ (1 − percentage rate)
For the same $10 target at the default ticket rate, that's ($10 + $0.75) ÷ 0.95 ≈ $11.32. Rounding up to the next quarter gives an $11.50 all-in price, which nets $10.17 after fees are rounded to the nearest cent. Substitute your own target and rates; the useful part is the method.
The all-in total is slightly higher than $10 plus a $1.25 buyer-paid fee. Building fees into the ticket price increases the amount on which the percentage fee is calculated, and rounding the price up adds a little more.
Quarter-dollar rounding is one option, not a pricing rule. A whole-dollar price may be easier to communicate. Check what it leaves you and what a family will pay, then choose deliberately. If your custom pricing includes a fee cap or other special terms, ask support to help calculate your prices.
Where to set it
- Open the event or pass in its editor.
- Find the Processing fee setting and choose We absorb fees.
- Set each ticket type's price using your actual rates and target net.
- To make this the default for new events, go to Account & Settings → Payments & defaults and set who pays service fees there. You can also update your default ticket types so new events start with all-in prices.
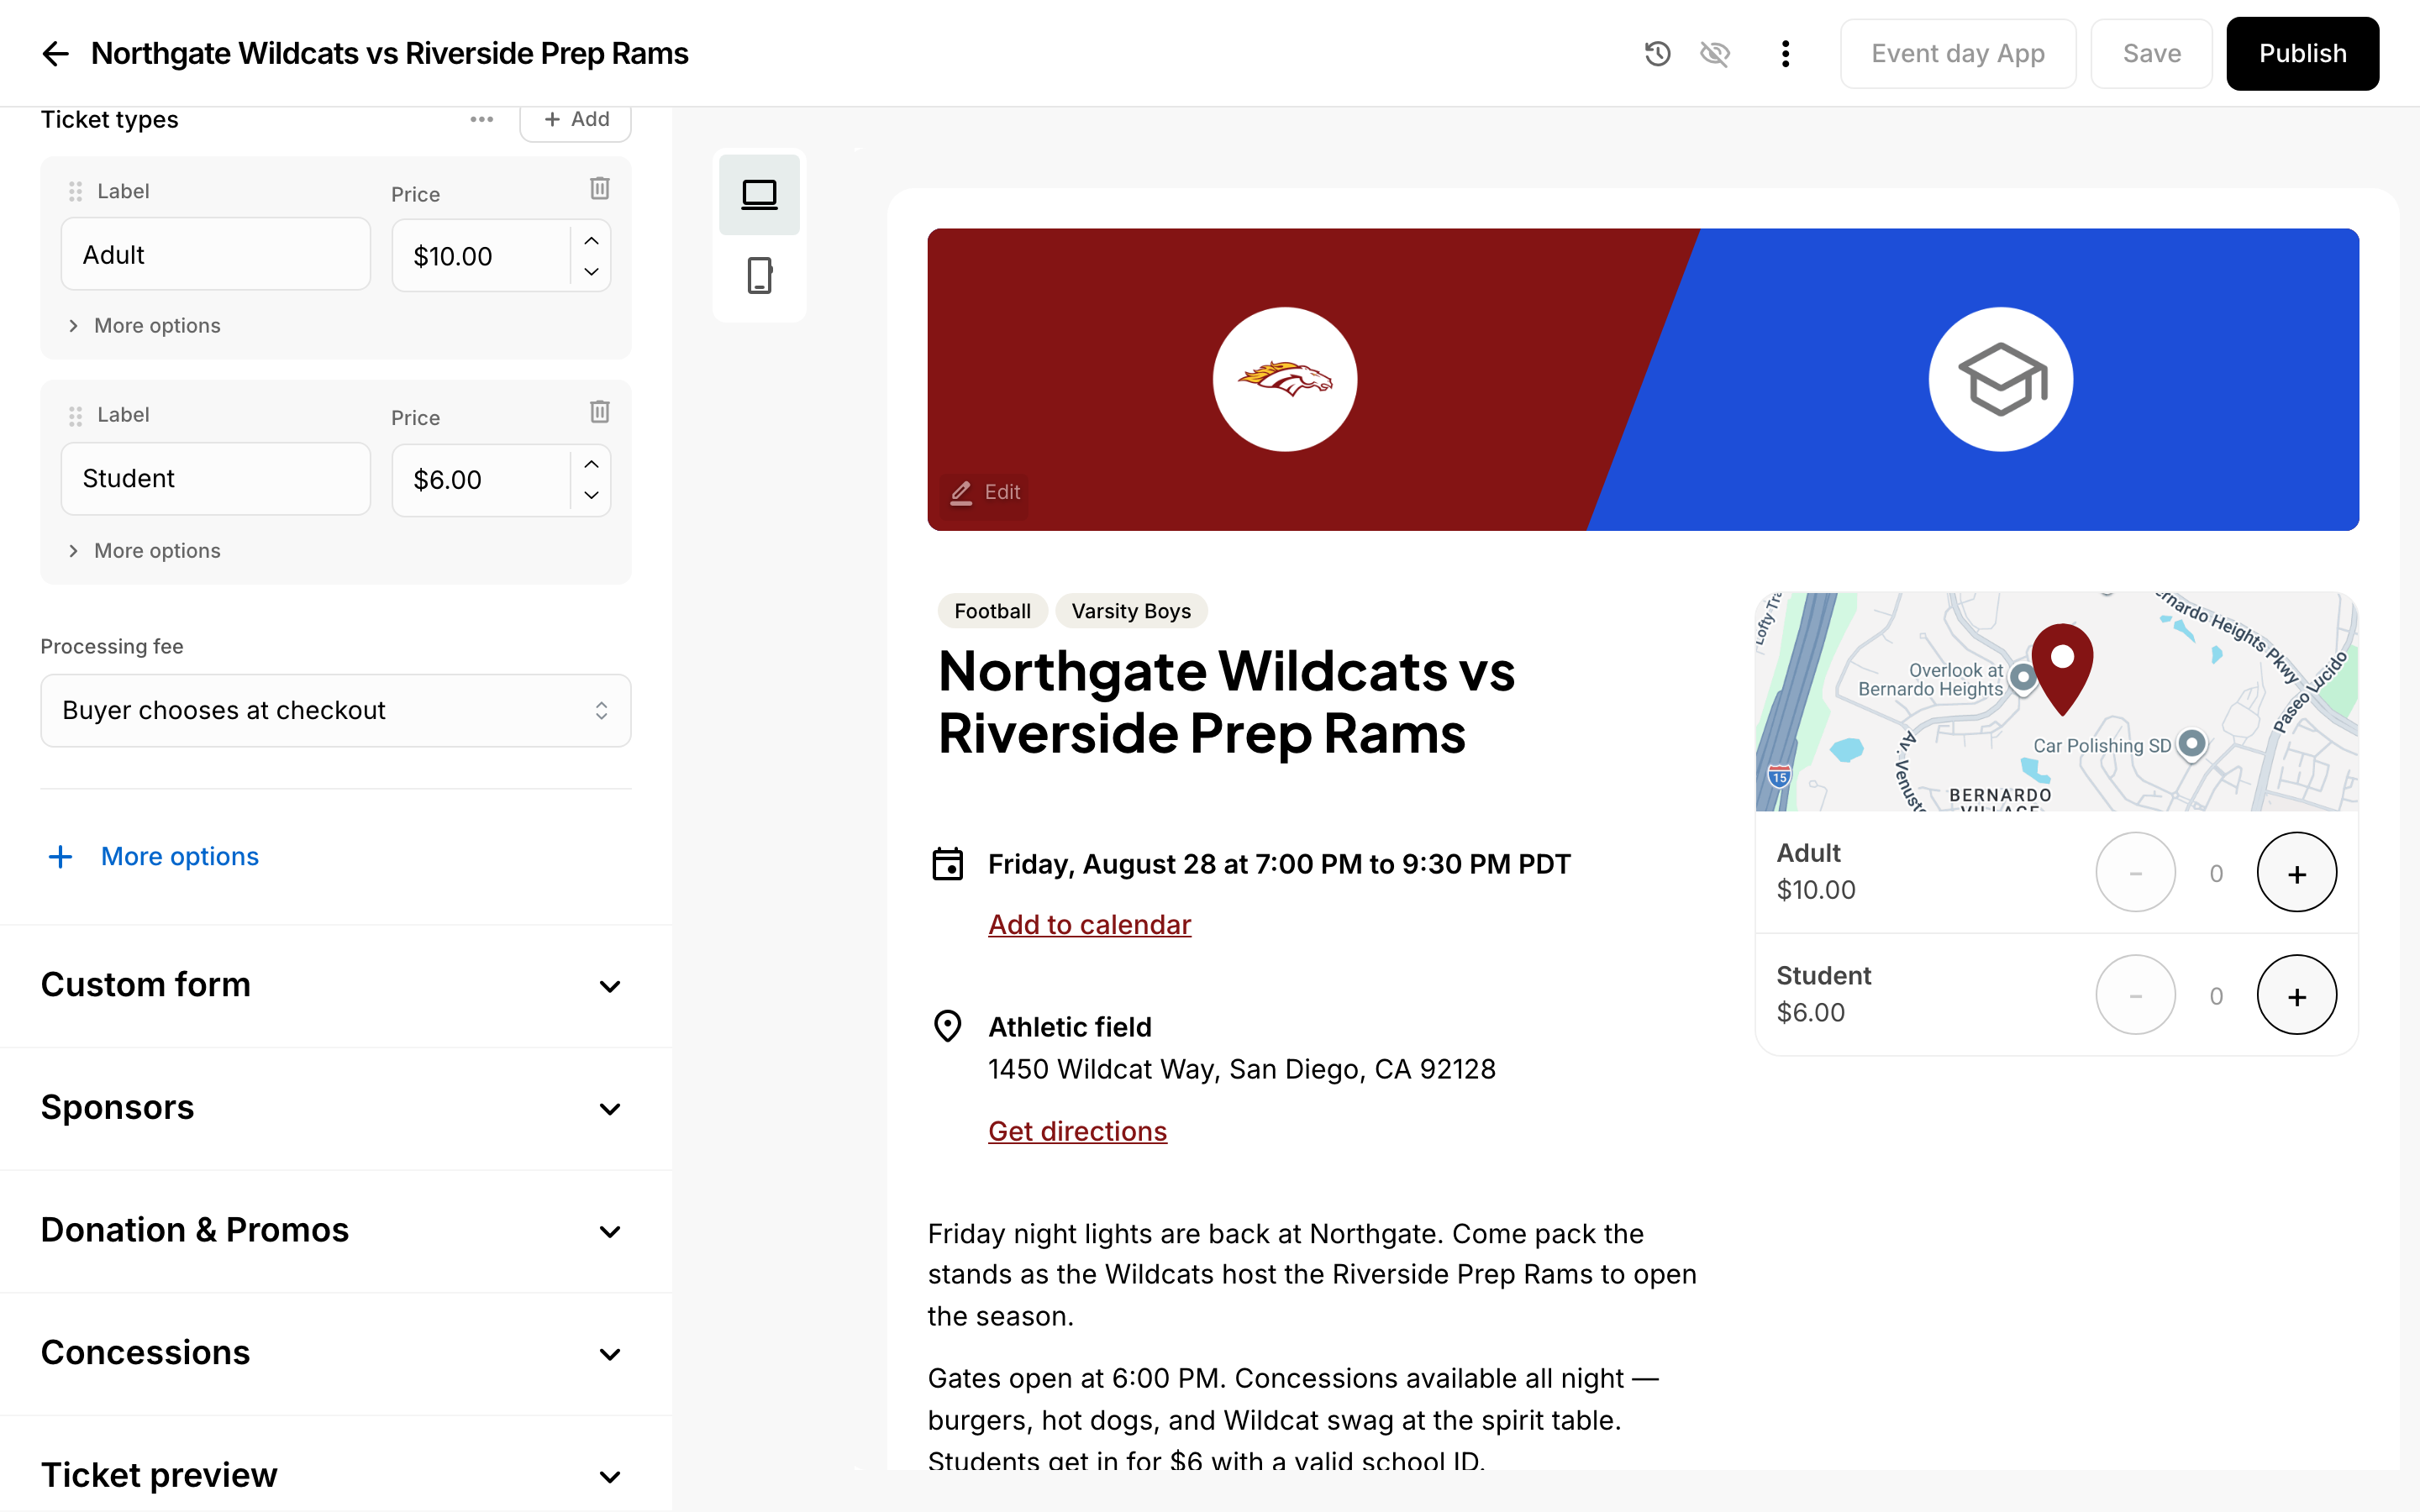 Ticket types and the Processing fee setting in the event editor.
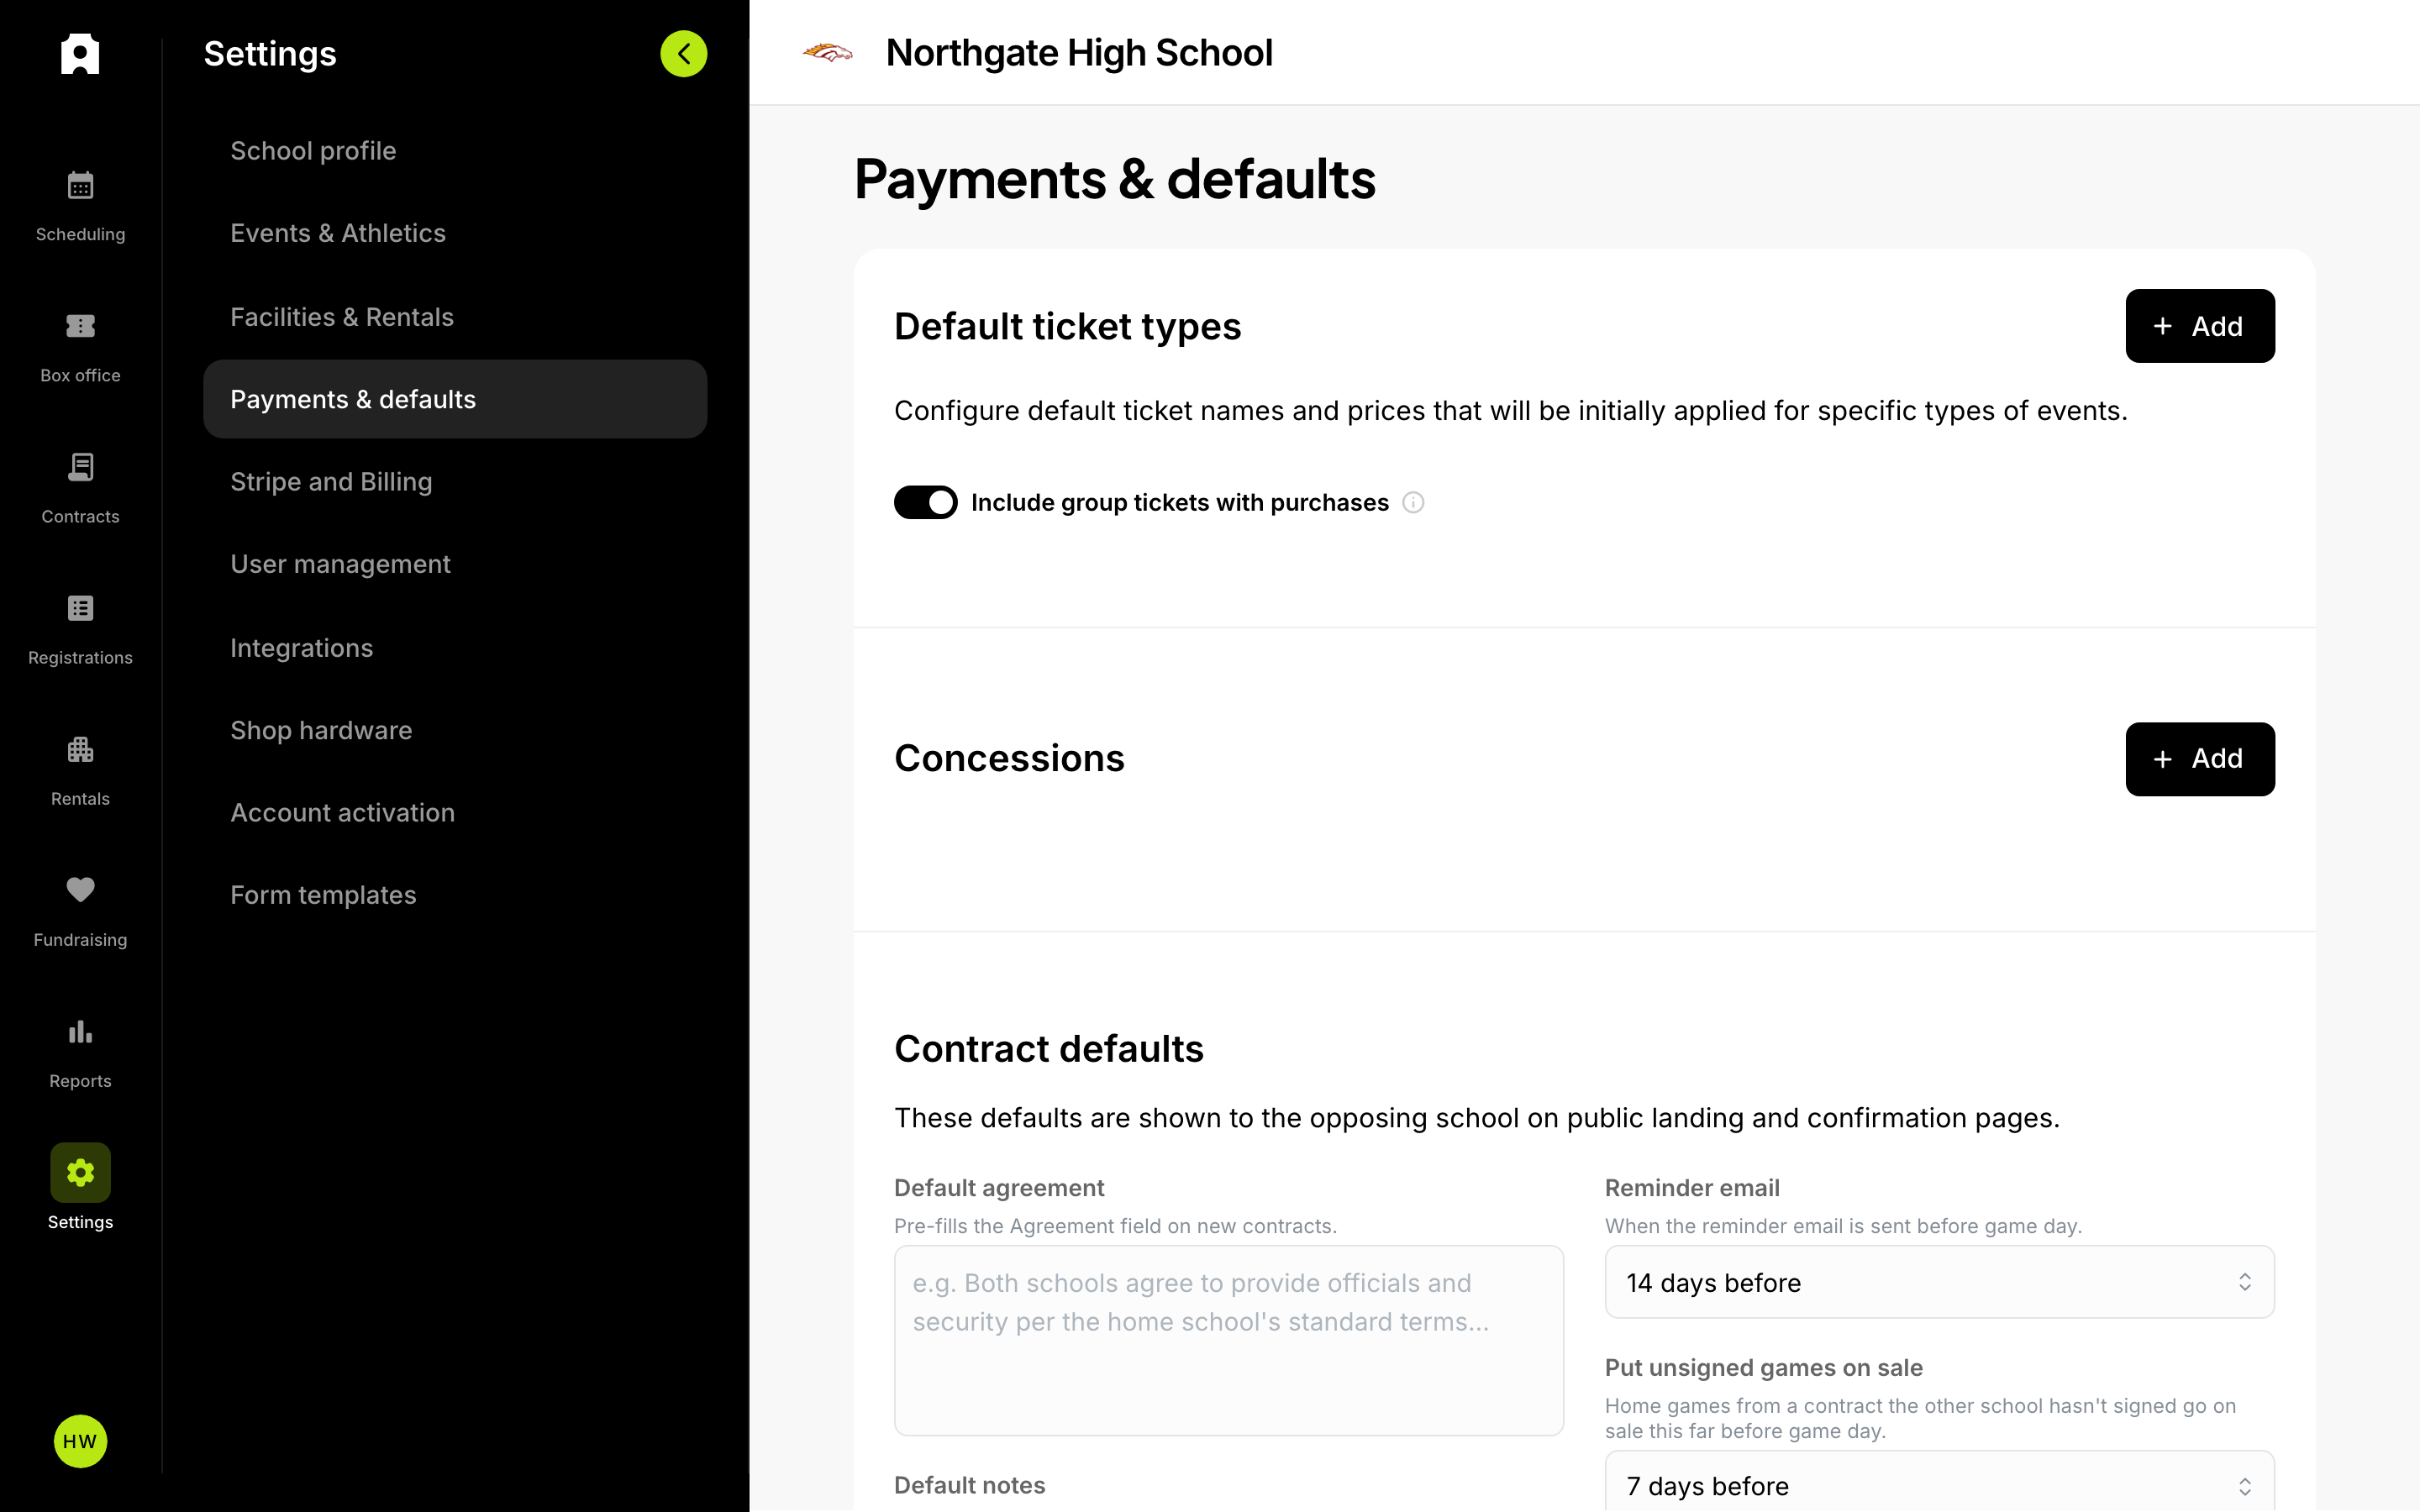 Payments & defaults settings for default ticket types.
Give every discount a purpose
Use a discount to make attendance accessible, attract additional buyers, or secure earlier commitments that help you plan. Discounting tickets people would have bought at full price reduces revenue, so decide what benefit you expect before offering a code.
Promo codes reduce the ticket price, and fees are calculated on that discounted price. For paid tickets, the percentage part shrinks but the fixed fee stays the same. At the default online rate, a 20% code reduces an $11.50 ticket to $9.20. Your net falls from $10.17 to $7.99—about 21%. If you discounted every ticket this way, you would need about 27% more sales to match the original ticket proceeds, before considering any additional event costs.
- Cap a limited promotion. A code's redemption limit helps contain the offer, but isn't a ticket limit: a redemption can discount multiple tickets in an order. Allow for order size in your budget.
- Honor ongoing benefits consistently. If all eligible seniors or staff are promised a discount, provide enough availability for that promise. A dedicated ticket type may be easier than a code that runs out. Make eligibility clear.
- Keep your regular price credible. If everyone should pay less, lower the price. Avoid an inflated regular price that buyers are expected to undo with a code.
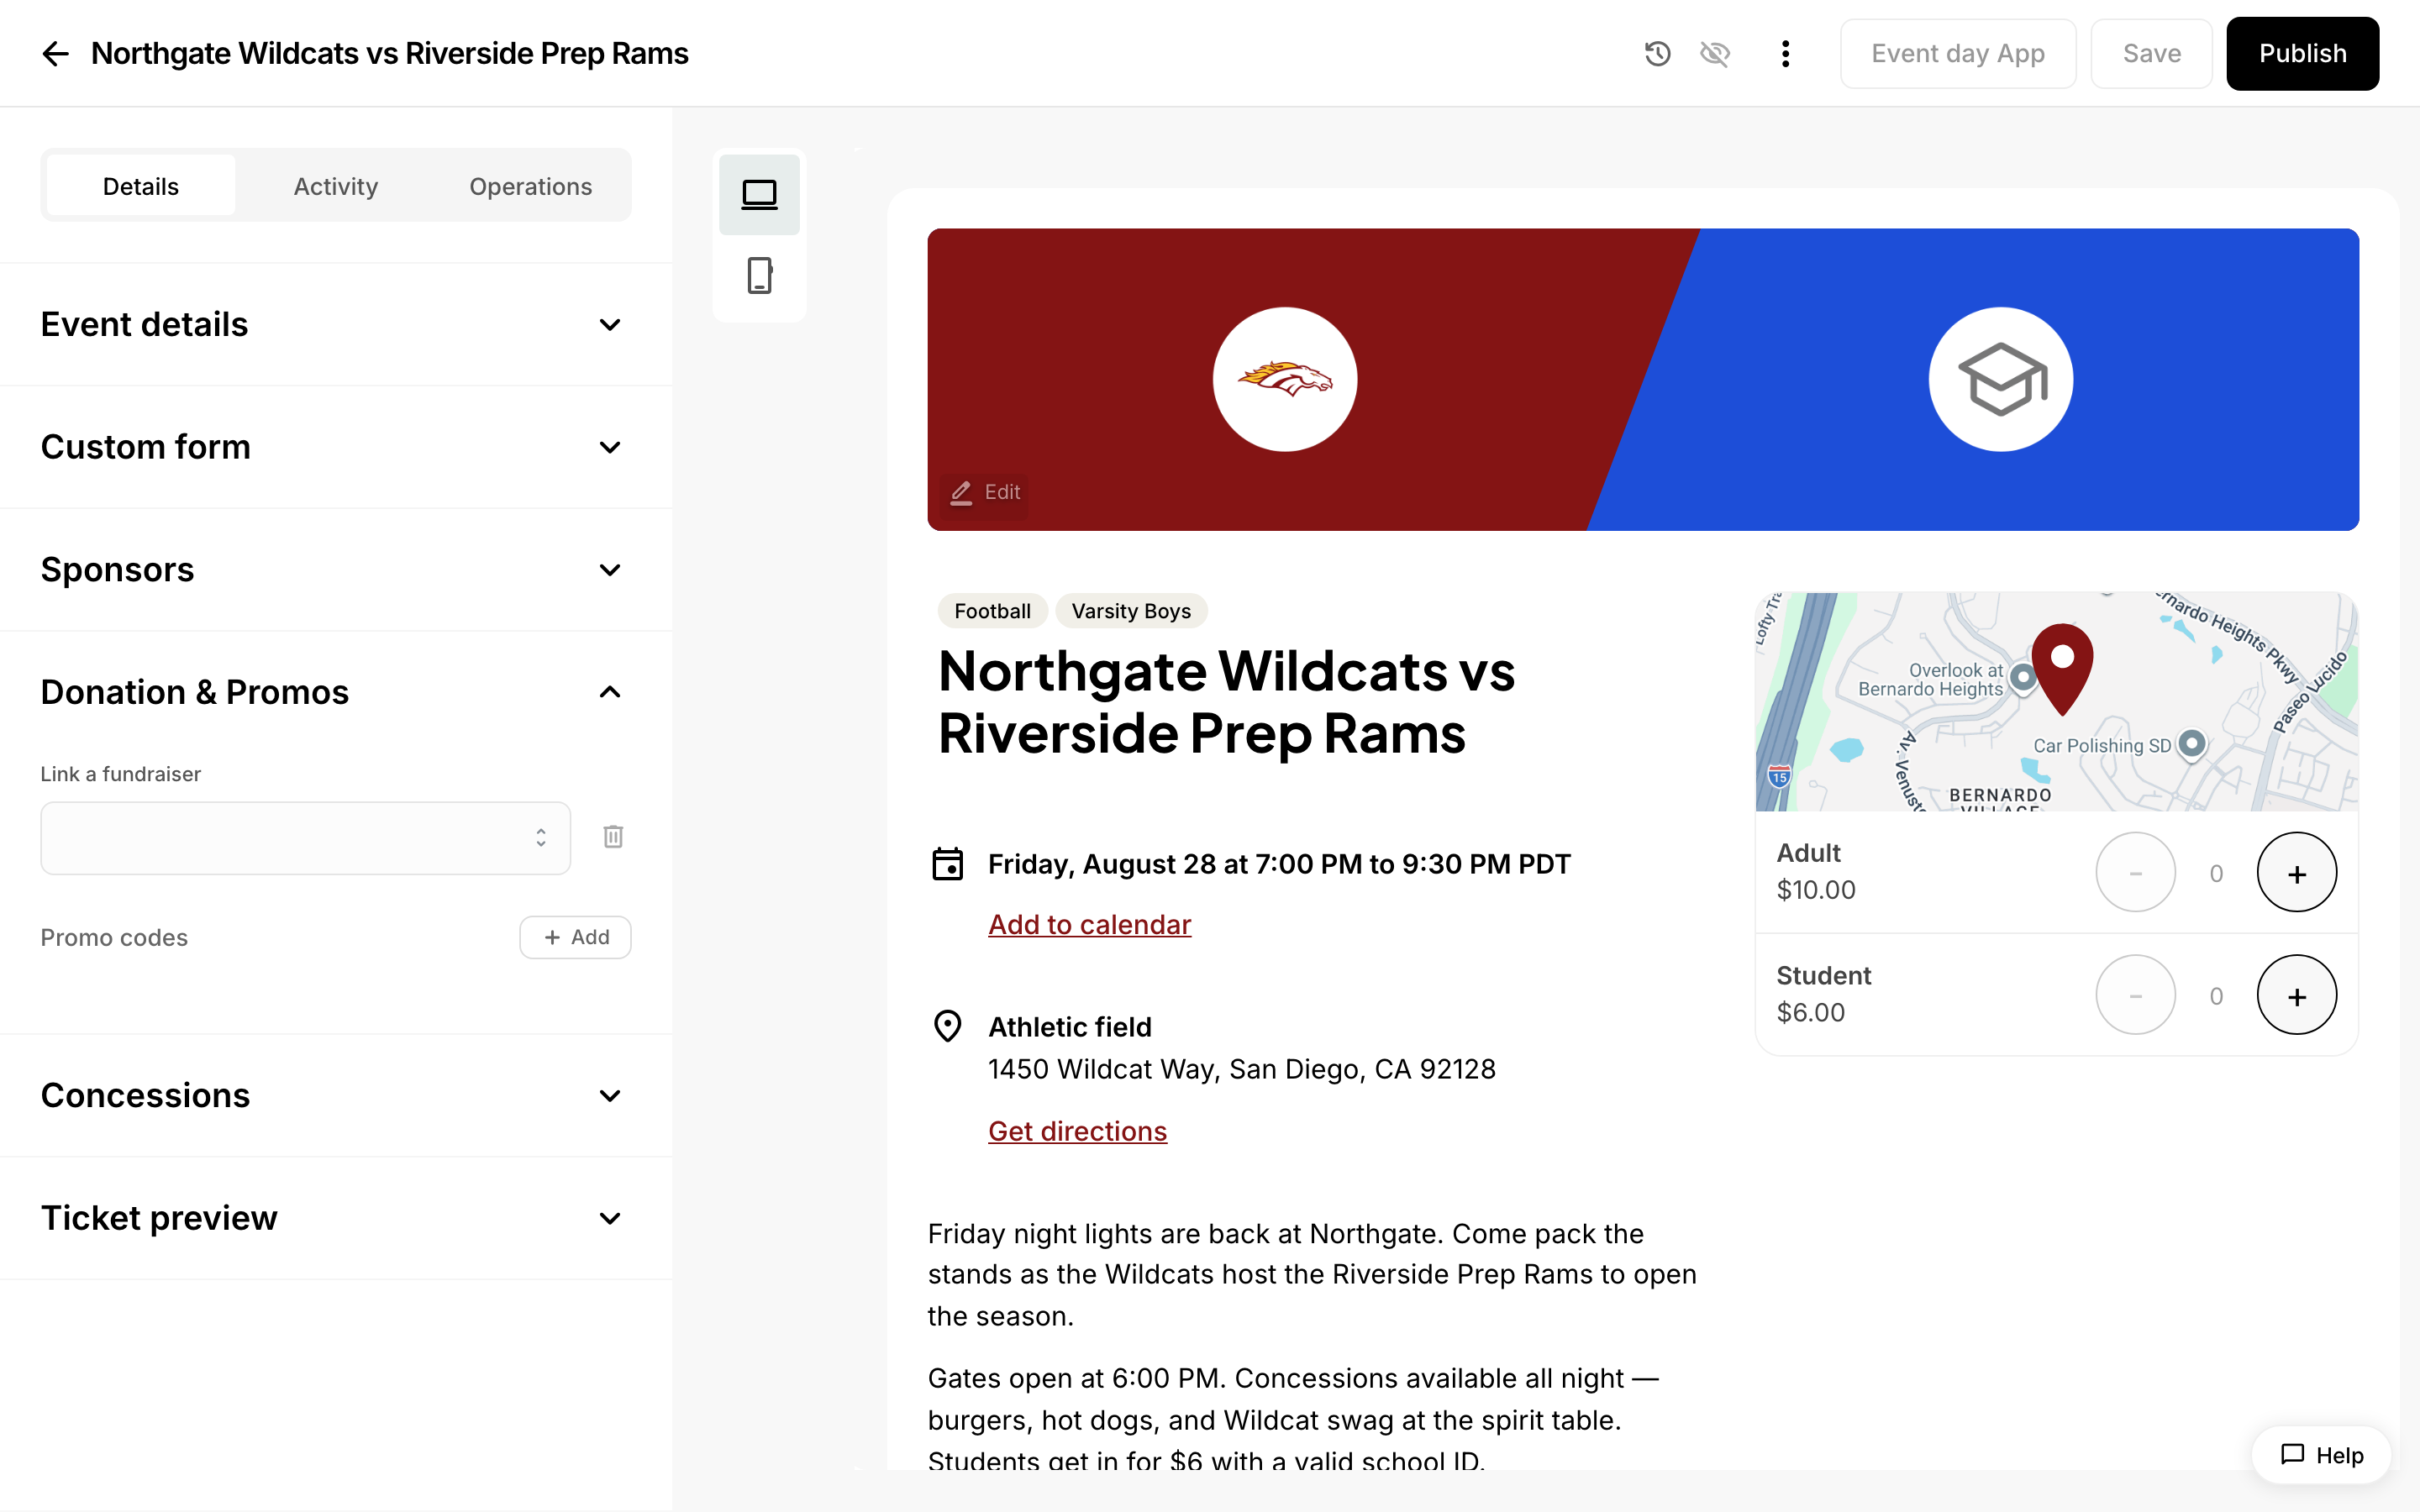 Donation & Promos section in the event editor, where promo codes are added.
Use scheduled promo codes for early bird pricing
An early bird offer is useful when earlier commitments help you plan or the offer brings in buyers who otherwise might not attend. If you expect to sell out at the regular price anyway, consider whether you need a discount at all.
For an offer with a deadline, use a scheduled promo code. Keep your regular all-in ticket price and We absorb fees setting, then create a code in the event or pass editor:
- Enter a Code such as EARLY10 and a Discount percentage.
- Set Ends to the last day buyers can use it. The code remains valid through that day, closing at 11:59pm in your institution's timezone.
- Set Starts if you want the offer to open on a future date, at 12:00am in your institution's timezone. Leave it blank to make the code available immediately.
- Optionally set Quantity to limit redemptions as well. Leave it blank for no redemption cap. When you use both a deadline and a cap, the offer ends when either is reached. Budget for multiple tickets per redemption.
- Save the event or pass and share the code, discount, deadline, and any redemption limit with buyers.
For example: “Use EARLY10 for 10% off admission through September 30.” Buyers enter the code at checkout to receive the discount; after the deadline, it can no longer be used. The regular ticket price stays in place, so you don't need to remember to change it when the offer ends.
For an offer limited by ticket quantity, use two ticket types. For non-seated tickets, create an "Early bird" type at the lower all-in price with a limited quantity, and a "General admission" type at the regular price. Set the limit under the ticket type's More options → Capacity. When the early bird allotment sells out online, buyers can select general admission. Staff selling in person can still sell past that cap, so agree on how to handle walk-ups.
State the quantity limit or deadline clearly before buyers start checkout. Budget using the expected mix of early bird and regular sales, rather than assuming every ticket earns the regular net.
Explain the price, then check the results
Use the same all-in admission price on posters, emails, the event page, and at checkout. For example:
Admission is $11.50, including all ticketing and processing fees.
If you raise prices, explain what admission supports and make any discounted options easy to find. Check the total for a family buying several tickets as well as for a single buyer. Clear pricing should help people plan their spending and decide whether to attend.
After a change, compare similar events or periods: paid tickets sold, total net proceeds, average net per ticket, and buyer questions or complaints about price. Look at repeat attendance where you can measure it. Account for differences such as the opponent, performance, weather, or capacity before crediting the fee mode. Fewer complaints are useful feedback; silence alone doesn't establish that buyers are happy.
Checklist
- Set a revenue goal using realistic paid attendance and the expected mix of ticket prices.
- Check your actual rates in Plan & Fees; custom pricing may apply.
- Build fees into the price and choose We absorb fees when you control pricing, or budget for your chosen alternative.
- Advertise the full admission price consistently and check the total a family will pay.
- Give each discount a purpose, clear eligibility or limits, and a place in your budget.
- Review total net proceeds, attendance, and buyer feedback after making a change.
Need Help?
If you want a second set of eyes on your pricing, contact Admittee support through your help center. Send your revenue goal, expected paid attendance, ticket types, and rates from Plan & Fees so we can help you work out a price list.